More
    Home Blog Page 9

    Easy DIY Fourth of July Decor

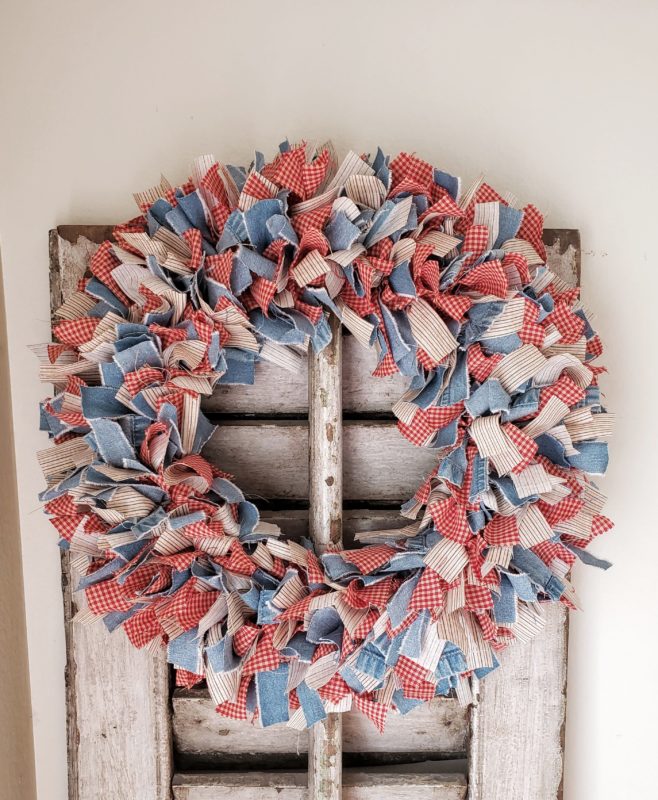
    Hi friends! I’ve been so busy trying to wrangle 2020 that I just realized 4th of July was less than 4 weeks away! Rag wreaths are one of my favorite DIY projects especially this time of year for Fourth of July…they just scream summer Fourth of July celebration! Especially red, white and blue decor… you can put them up for Memorial Day and leave them up for the fourth!

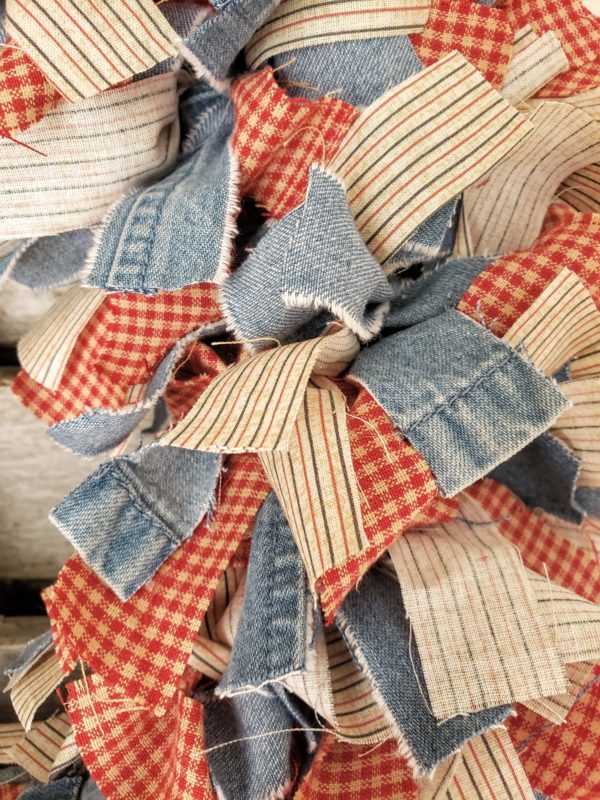
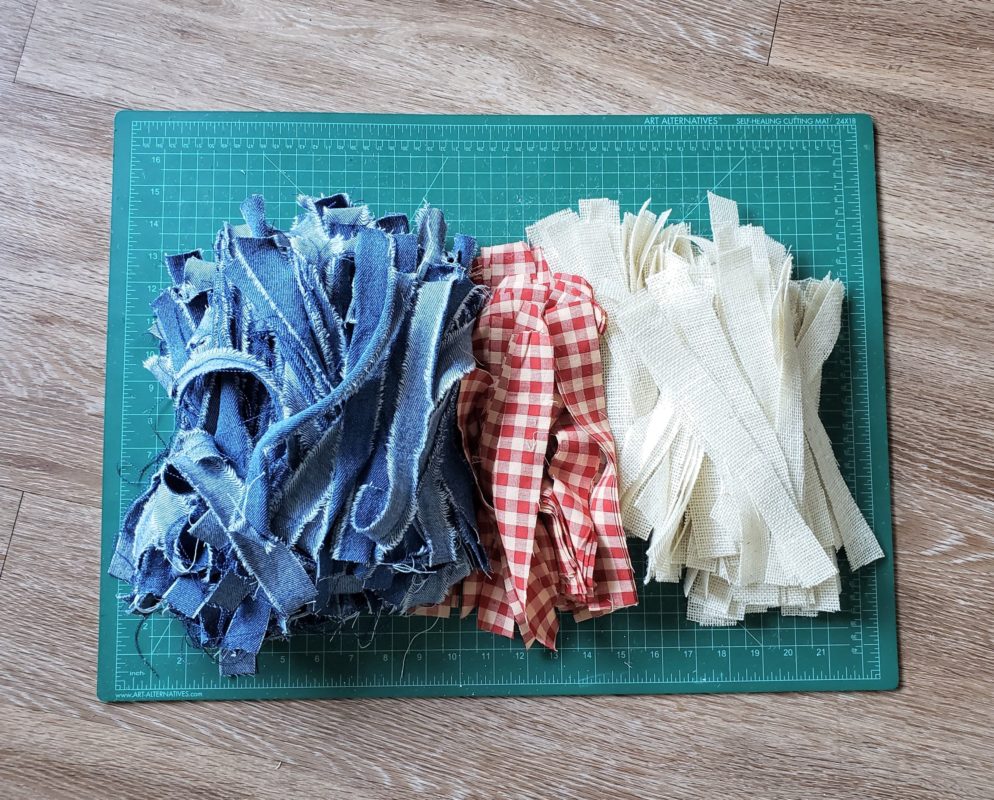
    This is the easiest project ever!…it just takes a lot of time. So, if you are someone with no patience I do sell them in my Etsy shop, and I’ll do any colors you would like. I’ll even make a kit for you if you don’t want to do the cutting part…for a patriotic, Fourth of July DIY project…I love this! Denim fabric, burlap for texture and a vintage look gingham! I’m obsessed with gingham… here’s the super easy way to make a fabric strip wreath! I am a lover of all things distressed and frayed ends so I rip the fabric when possible!

    Fourth of July Decor Ideas

    FUN TIP: Instead of buying denim, tear up an old pair of jeans…I love the whimsy of the seams and hems showing!

    I Love the Little Vintage Stripe and the Denim Jeans!

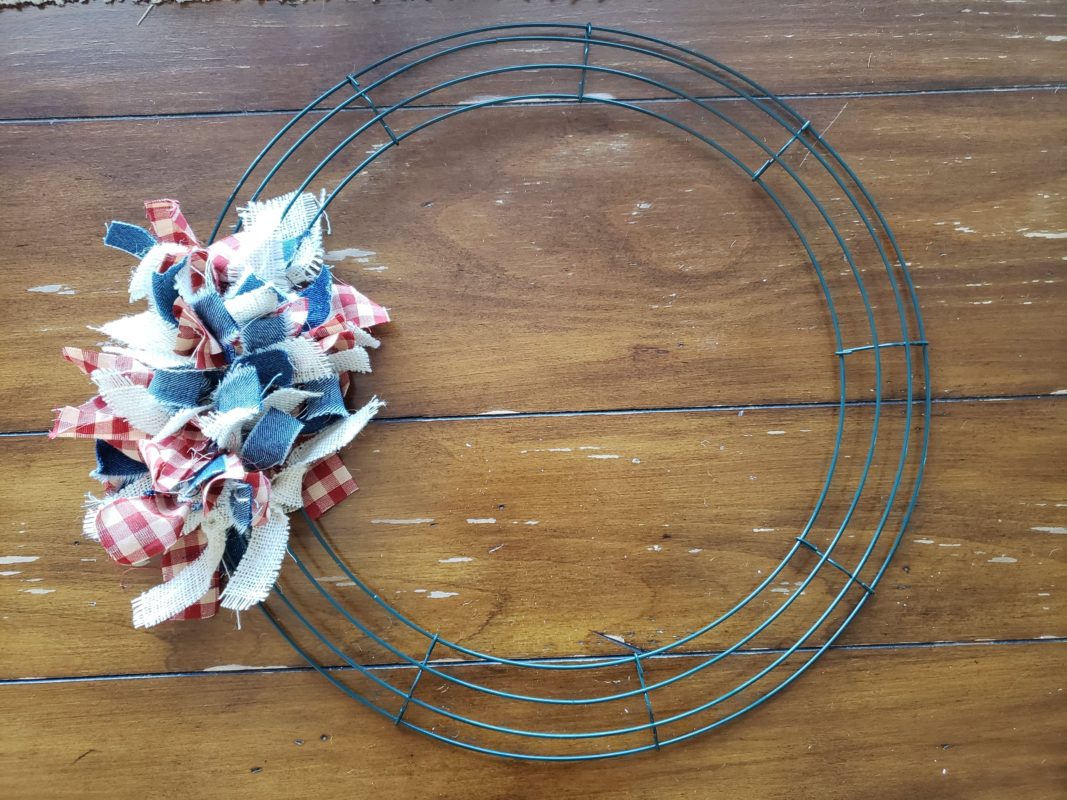
    For this big 23 inch wreath I started with an 18” wire wreath frame. Then just cut up your strips.

    TIME SAVING TIP: I like to either tear my fabric or use a rotary cutter so it frays a little plus its faster. You can use scissors for a cleaner cut. The burlap will definitely fray…I even pull a few threads to distress it a little more.

    I used about 450 strips (about 150 ea. fabric) on this big one give or take…I did 1”x 9” for the denim and the gingham and 1 ¼” x 9” for the gingham. Do the math on how many yards depending on the fabric width. I used approx.. 1 ¼ yd. gingham because its only 45” wide, but the burlap and denim usually comes a lot wider so normally a yard ea. is plenty.

    4th of July Red, White and Blue

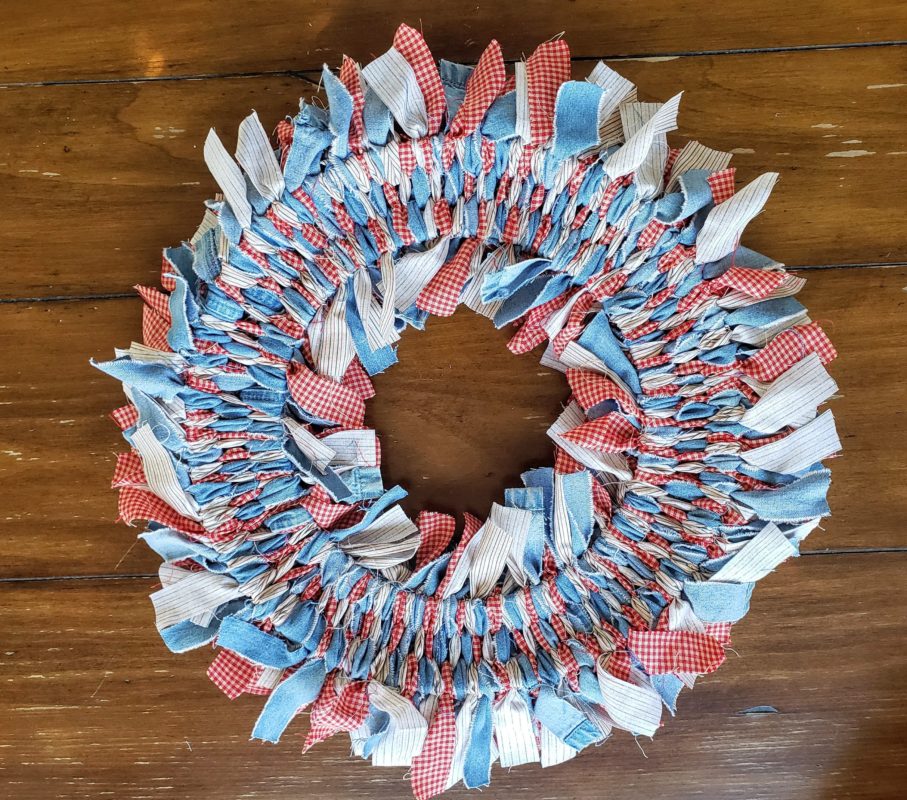
    Then just start tying (just a basic cross tie, not a knot). I use 2 wire rows at a time and start on the outer one., Then the middle 2 and then the last 2.

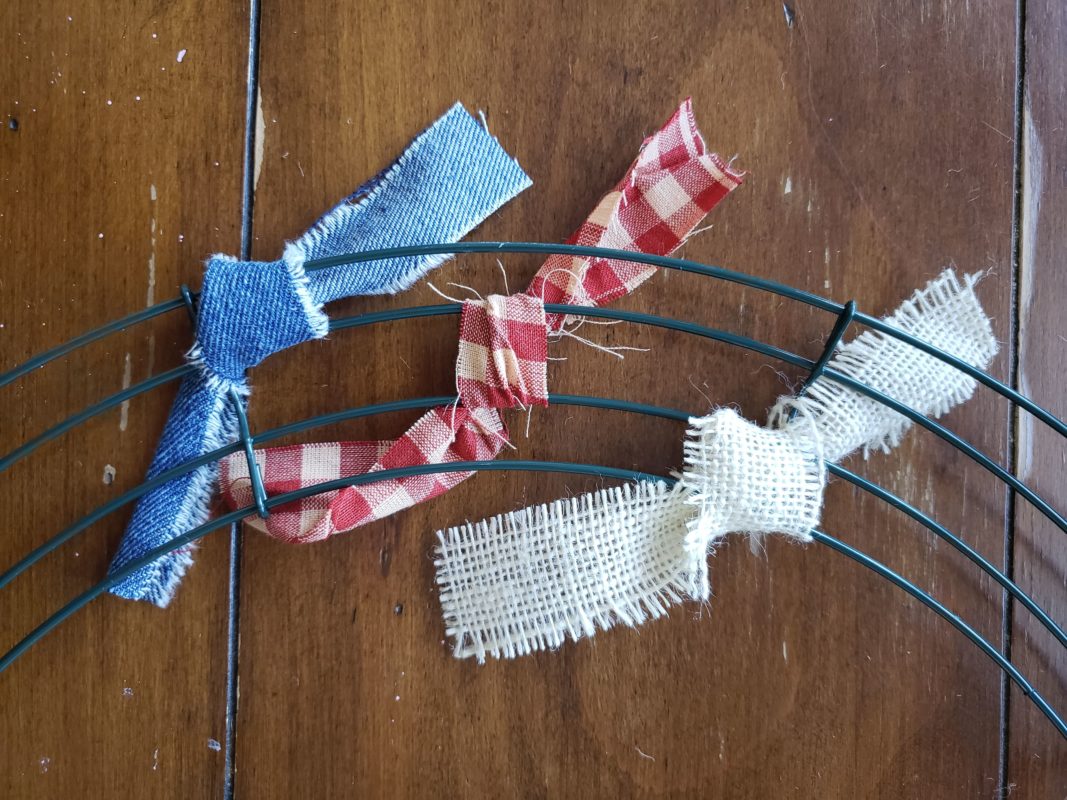
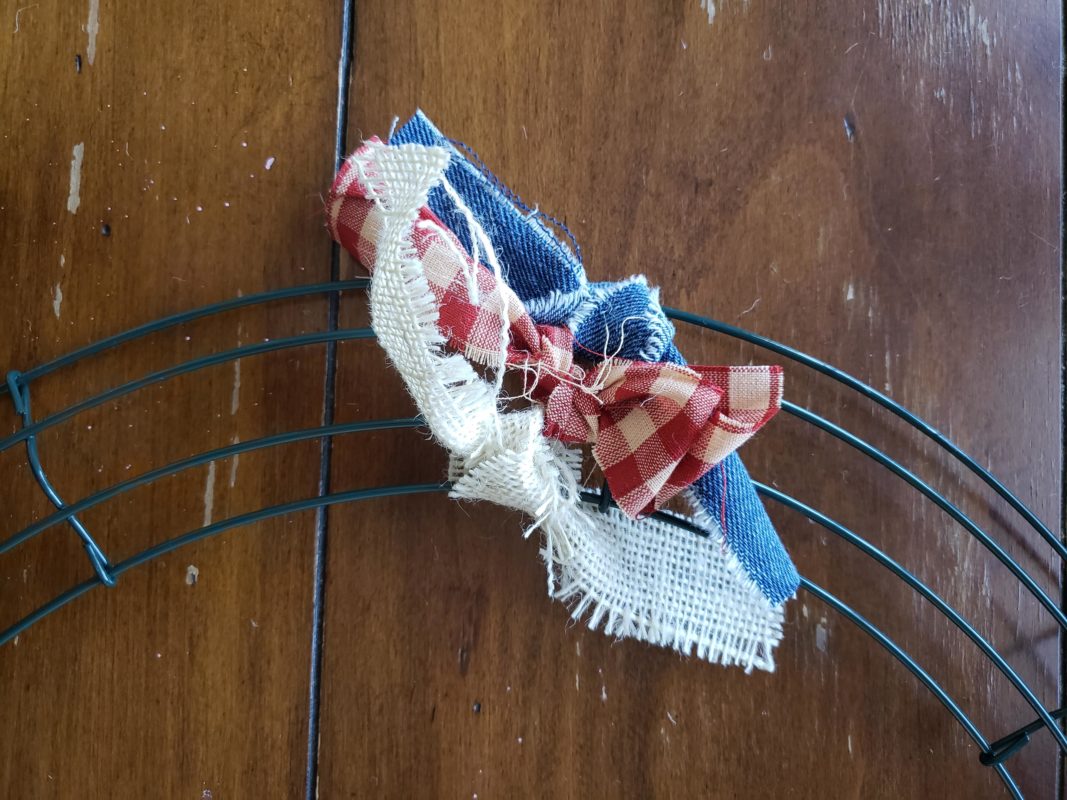
    Then just keep repeating until you fill a section, then start the next section and so on…I like mine really full so I push them super tight and keep filling a section until I can’t fit even one more strip in

    18″ Wire Wreath Form

    SANITY TIP: Try to alternate the 3 fabrics the best you can it doesn’t end the same in each row and its OK if you put the same ones next to each other… just try to space ea. color out evenly so you don’t have a clump of one color. Don’t overthink it you’ll make yourself crazy.

    23″ Rag Wreath

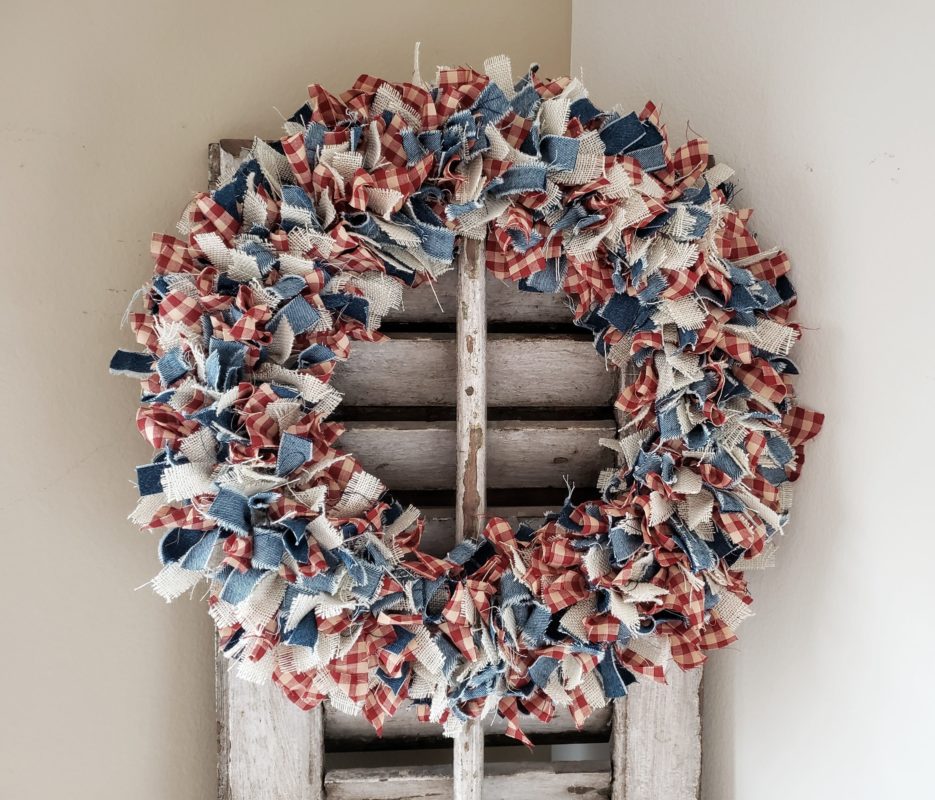
    That’s it!! The big wreath took me about an hour to cut the strips and about 3 ½ hours for tying

    Here’s the Back

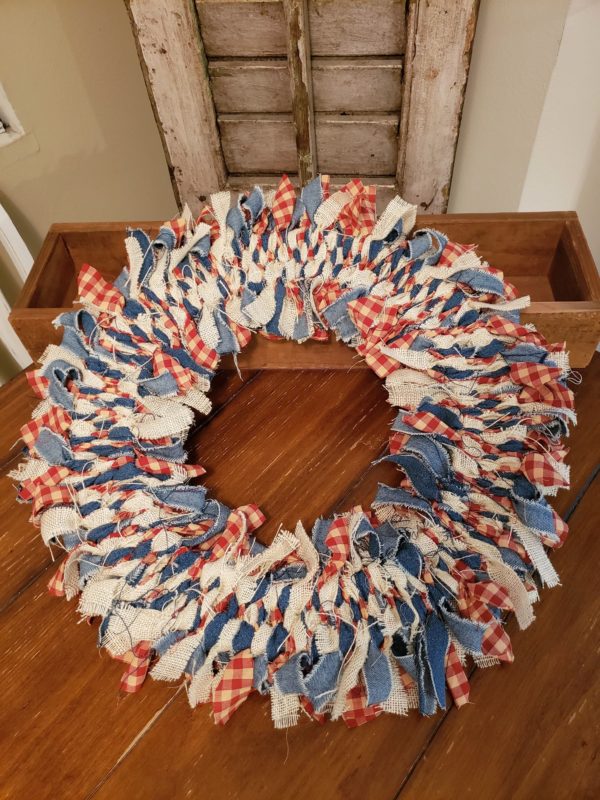
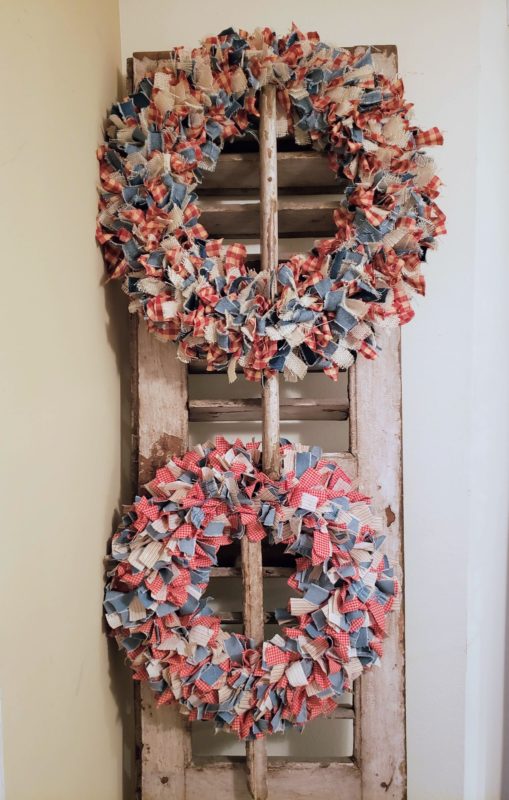
    This next one is my 17” wreath that started with a smaller 12” wire frame. I used a vintage stripe, a pair of jeans (my fav) and a extra small vintage gingham.

    This One Has Light Denim Jeans!
    I love the way the back looks too!
    18″ Wreath and 12″ Wreath

    Have fun! I would love to see your designs! Let me know if you have any questions and if you aren’t a DIYer feel free to visit my shop, order your favorite colors or email me for a kit!

    Happy Tieing!!

    Carrie

    XOXO

    “Sweet Magnolias” Southern Charm and Serenity Cookies

    Hi Y’all…LOVE the new series on Netflix called “Sweet Magnolias”!

    Photo: Netflix

    I’m so glad there’s a new series to binge on, so far it only has 1 season, 10-episodes…its a Netflix show called “Sweet Magnolias” and I love it! Fun, romance, and drama as 3 longtime friends who call themselves the “Sweet Magnolias” juggle life in a small Southern town called Serenity, South Carolina.

    You’ll recognize the actors and get hooked immediately on the story. It’s based on the Sweet Magnolias novels by Sherryl Woods which are great! And OMG.. wait until you see the season finale! I read that season 2 is in the works fingers crossed!

    First of Sherryl Woods “Sweet Magnolias”

    My friend from Tennessee just recently visited Covington, Georgia where it was filmed so I had her take a pic where they filmed it. (shhh this beautiful building is actually a law office).

    Covington, Georgia

    Hart of Dixie…is one of my all-time favs and I won’t even tell you how many times I’ve watched it! The breakup pies, the belles, the one liners, great fashion, craziness what’s not to love!…If anyone from HOD is reading this, please bring it back, even if it’s just a few episodes like they did with Gilmore Girls!

    Photo: Netflix
    Photo: Netflix

    So listen to this all my baking friends….Sherryl Woods has a Sweet Magnolias Cookbook! Of course, when I found out I had to make the Serenity cookies first!

    Photo: Sherryl Woods Cookbook
    Yummy!!

    Have fun binging on Sweet Magnolias and cookies!

    Carrie

    XOXO

    EASY DIY VINTAGE FARMHOUSE WALL RACK

    Hi Guys!…I’ve always loved vintage style wall hooks. Every time I see them, I want them, so I finally decided to buy some and make my way overdue wall rack. I found these on Amazon at a great price! As you know I love making chippy, distressed farmhouse signs so I thought I’d just make my wall rack the same way!

    I grabbed a piece of wood I already had for my signs, I painted it black, let it dry, then painted white over the black, let it dry and sanded it so you could see some black and some natural wood. I like a med grit sandpaper.  

    I decided on 5 hooks, measured them out evenly and marked where the holes were. I always like to pre drill my holes, so I don’t split the wood and it makes the screws go in sooo much easier!

    TIP: Measure the length of your screw and put a piece of tape on your drill bit a little bit shorter than the screw length. That way you won’t drill any deeper than your screw goes:)

    I drilled the holes where I had marked and then with my cordless screwdriver attached the hooks with their screws. I then turned it over and put 2 sawtooth hangers on the back. I hung it on my wall and it was perfect!!

    All finished!

    TIP: When measuring to hang something on your wall from the floor up, always measure in a few places because walls and floors are never even. Yes, most of us can just eye something and get it straight but if you use a level when hanging you’ll get it right the first time…hint, hint…

    Hang your favorite things!

    I just love my Favorit Oats purse!

    Update: If you’ve been following along….I FINALLY baked my sourdough bread! Yippee! Now I’m making “Herman”…to be continued…

    Have fun!

    Carrie

    XOXO

    Super Easy DIY Project

    Super easy DIY project! I am Rae Dunn inspired so I decided to give it a try so I could do barn farm and ranch!

    I grabbed a coffee mug from target and a oil based sharpie and went for it! First I washed the mug and wiped it with alcohol…Then I found a font I liked, copied it, blew it up and traced it on my mug with carbon paper. It took me a few tries to get it straight.. but who cares its foolproof!… If you make a mistake just wipe it off with alcohol and start over. I did tape the letters to the carbon paper and then to the mug so it didn’t move around.

    TIP: I used a ruler for the straight strokes so it didn’t look like a spooky font:)

    I put it in the oven on a cookie sheet and then turned the oven on…you don’t want to put it in a hot oven! Bake it at 350 degrees for 30 min. Turn the oven off and leave it in there about 30 more minutes while the oven cools back down. Done! I’ve washed it a lot and its held up great in soap and water! Think of all the things you could make!

    Have fun!!

    Carrie

    XOXO

    everything goes with cornbread…

    OMG…I don’t know about you but with everything shut down I am on major DIY project / baking overload! Last weekend while I was waiting for my second attempt at sourdough bread to rise, I decided to make some cornbread…my fav… to go with my homemade chili. “When in doubt make cornbread!”

    everything goes with cornbread…

    So while my cornbread was baking and my bread was rising…I decided to make some little purses for the fam with some bits and pieces of what I already had hoping it would put a dent in my creative energy which is seriously bubbling over right now. They came out super cute, so I wanted to share and I also put them in my Etsy shop!

    Little Girls Purse

    I am a baker/crafter already, but I am loving that this extra time is giving me even more ideas!  By the way…my rose petal bark and pistachio lemon cake was a huge hit!

    Were all in this together, so let’s share our DIY projects while stuck at home and our Covid-19 baking ideas…  I have always said…” inspiration sparks inspiration! “

    This weekend….I ordered some cute rustic hooks to do a wall coat rack…so…to be continued! And hopefully I will have sourdough bread…

    XOXO

    Carrie

    Great Find Alert!

    While I was writing my last blog, “how to display flea market finds”… I stumbled across these over sized, chippy, rustic signs so you know I just had to share!! They have metal and wood choices, are big, and priced great.

    How fun are these…and you can personalize them!

    I love how they add personality!

    You can find them at www.wallsofwisdom.com check them out!!

    Have fun shopping, send me your pics!!

    Carrie
    XOXO

    How to Display Vintage and Flea Market Finds

    You found that perfect treasure at the flea market! You negotiated, hauled it out to your car which many times can be far, far away! You get home, unload it, get it inside, and admire it in all its glory. Maybe you have the exact place you want to put it…but maybe you don’t! You start searching for that perfect spot and there is no doubt in your mind no matter what you have to do you will find it!

    You have 2 options, your either going to display things alone or group them in a vignette with other things.

    Note: A vignette means small or short to set the scene, but important. In a display it means concentrate on that one little area.

    A vignette can be on a wall, a table or on anything.  It can be a theme, holiday or just a collection of things. When I create a vignette in a store it’s for the purpose of selling. When I create vignettes at home it’s usually for a holiday or because I ran out of room! I’m sure you’ve experienced the latter if you love vintage finds and flea markets!

    The way you display old things makes them new again.

    There will come a time when you have to part with something old to make room for something new, but until then just remember, a “vignette” is your best friend…it allows you to fit more in your space! These great pics are from my Pinterest browsing addiction;)

    Happy Hunting!

    Carrie

    XOXO

    Rose Petal Bark and Pistachio Lemon Cake

    Baking to me is arts and crafts that taste good… and I love creating anything, so I love baking! This weekend I made pistachio lemon cake, rose petal bark, and sourdough bread from a starter my friend gave me. My lemon cake is a crowd favorite but I was dying to try a pistachio lemon cake twist, so instead of adding my usual lemon pudding I added a box of pistachio pudding and sprinkled the top with chopped pistachios because I love pistachio anything!  It was amazing, and I love, love, love the green color! You have to experiment with baking…if you don’t try new things, you’ll never discover new favorites! I just love these, so I had to share!!

    Pistachio Lemon Cake Recipe

    1 box lemon cake mix, I like DH (or can use a yellow cake mix)

    1 box 3.4oz lemon instant pudding (or pistachio if you want to try it)

    ½ c Oil

    4 eggs

    1 c Water

    4 teaspoons freshly grated lemon rind

    1 1/3 c powdered sugar

    5 T fresh squeezed lemon juice

    Preheat oven to 350 degrees. Beat eggs, add oil, water, pudding, and cake mix. Add ½ of the lemon rind into the mix. Mix on med speed about 3-4 min. Pour into greased and floured Bundt cake pan and bake for approx. 35 depending on your oven. While your cake is baking combine your lemon juice, the other half of the rind and powdered sugar and set aside. When your cake is done set pan on rack to cool for 5 min. before removing it from the pan. Put the cake on the rack with a sheet underneath to catch drips and drizzle the lemon juice/sugar mixture over the warm cake. (I also poke a few toothpick holes in the cake, so the juice goes inside). Once the cake has cooled you can sift some powdered sugar over the top if you would like. If I make the pistachio version, I sprinkle chopped, roasted pistachios on top.

    One of my many fav things to use in baking is edible flowers… they are organic, cute and something you don’t see every day! This chocolate bark is a blend of edible roses, dried strawberries, pistachios, and flaky pink sea salt. What dessert wouldn’t be good with flaky pink sea salt! I sell the “rose petal bark” and the fixings to make it yourself it if you don’t want to run all over town getting everything… just em me for more information!

    Rose Petal Bark Recipe

    2 bags (12 oz bags) white chocolate melting pieces

    ½ c —Chopped culinary roses or rose petals

    ½ c— Chopped dry roasted pistachios

    ¾ c— Chopped freeze-dried strawberries

    1 tsp Flaky pink sea salt

    Line a cookie sheet, or Pyrex dish with parchment paper. Melt your chocolate in the microwave and pour into the dish. Quickly, spread the chocolate around with an offset spatula or knife. You can make it smooth or rough. Sprinkle your roses, strawberries, pistachios and salt over the top and push them down very lightly, they all won’t stick and you will lose some of your toppings when you cut it so make sure you put a lot on.  Pop it in your refrigerator for 15 min to set. Take it out and break it up into whatever size pieces you would like. You can also cut it into perfect squares if you would like a more finished look.

    Last but not least my sourdough bread is still a work in progress and still rising so I have no idea how that’s going to go. I haven’t made bread in years! I keep picturing it rising out of the bowl and taking over the kitchen! So….”to be continued” on the sourdough bread!

    I hope you enjoy these, let me know!

    Happy Baking!

    Carrie
    XOXO

    10 DIY TIPS FROM A GENERAL CONTRACTOR

    Hi Friends! We are in the era of DIY now more than ever! This beautiful photo is the Villa Cortille from one of my favorite sites Decoholic.

    As a woman general contractor and a DIYer I have learned some tips and tricks to pass on! I am so excited that you all are jumping in too! First, keep in mind not all projects are created equal…use professionals if the project is too big, you don’t understand it, or you are not qualified to complete it. So arm yourself with some blue tape, a big tape measure, start small and go for it…there’s nothing like a DIY project!

    Start with hybrid projects…they are great so you can do the phases your comfortable with and hire the professionals for what they do best!

    There are 2 things that are nonnegotiable!.  Do not to attempt anything yourself that is not SAFE and could cause damage or harm. The Average is 15% upfront with some exceptions. Just remember if the amount raises a red flag its probably for a reason!

    1 – Negotiate – everything is negotiable, paint, tile, wood…anything.

    2 – Order it yourself – ask your installer what you need and order it, unless they give you a bigger discount. Specialty stores are very knowledgeable and helpful. Be sure you have everything that is needed to complete the job. You don’t want to order trim pieces or extras after the fact, they may not match.

    3 – If you have a good sub ask for referrals. They usually have a network of the same caliber of work.

    4 – If it requires a permit you probably shouldn’t be doing it yourself. Stick to the small projects.

    5 – Always get 3-4 verified referrals before hiring anyone. Don’t just read yelp reviews.

    6 – Check all of your subs license, bond and insurance. If they are doing work for you they should have it all.

    7 – Educate yourself so you know about the project your sub is working on. Know what they are ordering, why you need it and if they are doing the work or hiring someone else to come in.

    8 – Source your own materials, I guarantee you are paying someone by the hour to find your products and materials. You can even pay for the materials yourself and pay your sub separately. Order 20% extra for most products in case of problems or damage especially flooring and stone.

    9 – Communicate with your contractor or subs and don’t be afraid to speak up. They are working for you so have confidence. Just don’t call them at all hours of the night, they have a life too!

    10 – Get yourself some blue painters’ tape and put pieces in places or on items that have issues, or you may have questions about. Make a final “punch list” which is a list of all the things that need to be fixed before final payment! I am known for my blue tape and punch lists!

    So that’s my tips, I hope they help! If you have any questions feel free to em me!!

    Have fun!!

    Carrie
    XOXO

    5 WAYS TO SHOP AND BUY LIKE A DESIGNER

    “Sometimes I open my mouth and the truth, it just comes out!”
    Lemon Breland

    You do not need to be an interior designer to shop like one, and I am going to spill the secret and tell you where we shop and how we shop. Being an ASID designer and a general contractor has its perks and I am always asked “How do I become a designer so I can get designer discounts?” You can get them now!

    First, we are people, not superheroes. We spend hours sourcing and googling just like you. We walk into the same stores that you do and shop at the same stores …tada that’s it! Orient Express furniture is all over the internet on sites like Amazon, Overstock and Wayfair. We may have a connection here and there and know about some really cool places but that just comes with experience!

    Orient Express Furniture

    Second, all you need is a resale number and a business card, and you can buy just like us. You get the same discount, the same products, and the same service. When we walk into the design center that’s all we have, we aren’t armed with portfolios, degrees or referrals…we have a resale number and a business card…boom…that’s it!

    Third, do not ever be afraid to walk into a store, ask online or call a company to see what their requirements are…I promise, they are not going to give you a test on interior design!

    Fourth, most of your home stores have a discount if you ask, but many of them have a “designers” discount of a little more. Restoration hardware, pottery barn and living spaces all give designer discounts. But many times, we are shopping where you are shopping!

    Fifth, we live at TJ Max, Home Depot, and all of the other stores you already shop at. We just take off the tags and present it differently.

    That’s all the secrets I have to spill today but check back as I reveal “How to work with contractors!”

    I think everyone should love their surroundings so please email me with any questions!!

    Happy Shopping!

    Carrie
    XOXO

    Carrie Bachmayer
    "Welcome, Friends of The Striped Barn! You've found the perfect spot for styling, staging, and celebrating. Let's connect, get creative, and share some inspiring ideas!"
    0FansLike
    0FollowersFollow
    19FollowersFollow
    0FollowersFollow
    0SubscribersSubscribe